Unbrick of the death !

If your WDTV reboots or restarts blocked, it is because your flash failed.
But there is a solution (that doesn’t work in all cases but will allow you to take control via JTAG) !

To force the flash, you will have to invalidate the primary file system !

You must remove the motherboard from the case. Then desolder the metal shield.
You must use a high power soldering iron if the heat is absorbed by the metal plate. Personally, I use a mini torch.

Then you have to solder a wire on a pin of the “Chip Enable” flash chipset. (Use a low power iron soldering now).

The wire must be long enough to go around the mainboard and touch the VCC jtag pin.

Now it should boot without touching for now. This is what the JTAG displays :

Reading NAND CS0, addr 0x01280000, size 0x00000800 to 0xb5ffbfc0
Reading NAND CS0, addr 0x01280800, size 0x003aac00 to 0xb5ffc7c0

There are tree reading operations.
Reading NAND CS0, addr 0x00d80000, size 0x00000800 to 0xb63fbfe0
Reading NAND CS0, addr 0x00d80800, size 0x00022400 to 0xb63fc7e0

Reading zboot
....
Reading NAND CS0, addr 0x01280000, size 0x00000800 to 0xb5ffbfc0
Reading NAND CS0, addr 0x01280800, size 0x003aac00 to 0xb5ffc7c0

Reading primary file system
....
Reading NAND CS0, addr 0x00780000, size 0x00000800 to 0x01840000
Reading NAND CS0, addr 0x00780800, size 0x00402400 to 0x01840800

Reading secondary file system

The readings two and tree only take tree second. You must then operate during the second reading, then make the wire touch the VCC for less than a half of a second. The primary filesystem MD5 will be invalid. The WDTV will then directly boot to the secondary file system but will only partially execute the init script.

You should now get the jtag bash. If this is not the case, it’s very bad !
Insert the USB drive with the homebrew and run the command ./init upgrade.
Wait, reboot and flash.

I performed this only two times, but both flawlessly.

Good luck !

JTAG

Warning : Opening your WDTV Live Streaming device will void its warranty !

To open your WDTV Live Streaming Gen3, first find the screw under the back label (near the mac address). Use a Torx size T10 screwdriver . Unscrew and push the screw to open the case.

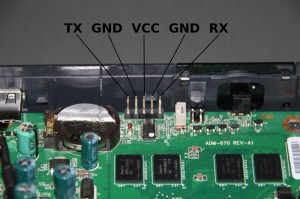
You must use a RS232 to TTL converter to connect your computer to the WDTV Live. The converter transforms +9V/-9V RS232 signal to 0V/3.3V TTL.

The TX WDTV must be connected to the RX computer and the RX WDTV must be connected to the TX computer.

Transfer parameters : 115200 baud, 8bits, no parity, no control flux.

Western blocked input so you can’t use Yamon option or bash command. (except in special cases that i will explain in a next post…)

First compiled GPL code !

This article is obselete. See the post Compiling Homebrew 1.08.17 on Ubuntu 12.04

Warning : Flashing the WDTV Live Streaming (Gen3) will void its warranty and the online streaming service functionality will not be available anymore !
!!! Do it at your own risks, I WILL NOT be taken responsible for any damage caused to your device (such as brick) !!!

Why using GPL code ?
GPL code allows to add functionnality to your WDTV box (I will add SSHFS support in a next article)

What you need ?
- A Physical or Virtual PC running Ubuntu version 8.04 or newer in 32 bits (64 bits returns an error during compiling)
- At least 6 Gb free space on your hard disk drive.
- The source from Western Digital : WDTV_LiveStreaming_GPL_Code_package_1.05.18.zip and the toolchain for cross-compiling GPL_toolchain_of_WDTV.zip
- Some A lot of time (more than 6 hours on my P4 2,4 GHz !)

Processing :
- Create a directory on your home directory and transfer your download in
mkdir wdtvgen3
cd wdtvgen3
wget http://download.wdc.com/gpl/GPL_toolchain_of_WDTV.zip
wget http://download.wdc.com/gpl/WDTV_LiveStreaming_GPL_Code_package_1.05.18.zip

- Uncompress and configure toolchain for cross-compiling
unzip GPL_toolchain_of_WDTV.zip
tar xzfv GPL_toolchain_of_WDTV/toolchain_binary/mips-4.3.tgz
sudo mv mips-4.3 /opt

- Uncrompress and configure WDTV GPL source code
unzip WDTV_LiveStreaming_GPL_Code_package_1.05.18.zip
tar xzfv PALACE_1.05.18_G.tgz
echo "export DIRECTFB_I=~/wdtvgen3/PALACE_1.05.18_G/src/libs/qt-everywhere-opensource-src/directfb" >> ~/.profile

- Exit and relog for loading environment variables, and verify
echo $DIRECTFB_I

- Edit and patch the code (Western left a trap in their code :-) )
Open PALACE_1.05.18_G/src/libs/Makefile and comment (add a # at the beginning of the line) the line 168 "#LIBS_LIST_y += libsigcpp boost libtorrent-rasterbar mdnsresponder (generates errors during compiling and i don’t want bittorrent)

cd PALACE_1.05.18_G
make distclean
make

- Go to sleep …
make install
make firmware

- Open the wdtvlivegen3.ver file and increase the version number VERSION=’1.05.18_G’ to VERSION=’2.05.18_G’ (this is useful only if you reflash a previous GPL firmware)

- Copy all files in the Palace_launch_1006 folder at the root of an USB key formatted in FAT32 (this is useful only if you flash from official firmware)

- Flash your WDTV Live Streaming, wait for the GPL Warning and remove the USB key.

- Copy the 3 wdtvlivegen3 files in PALACE_1.05.18_G/build at the root of your USB key.

- Flash your WDTV Live Streaming !

> You now have a GPL firmware !