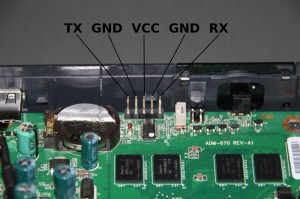
If your WDTV reboots or restarts blocked, it is because your flash failed.
But there is a solution (that doesn’t work in all cases but will allow you to take control via JTAG) !
To force the flash, you will have to invalidate the primary file system !
You must remove the motherboard from the case. Then desolder the metal shield.
You must use a high power soldering iron if the heat is absorbed by the metal plate. Personally, I use a mini torch.
Then you have to solder a wire on a pin of the “Chip Enable” flash chipset. (Use a low power iron soldering now).

The wire must be long enough to go around the mainboard and touch the VCC jtag pin.
Now it should boot without touching for now. This is what the JTAG displays :
Reading NAND CS0, addr 0x01280000, size 0x00000800 to 0xb5ffbfc0

Reading NAND CS0, addr 0x01280800, size 0x003aac00 to 0xb5ffc7c0
There are tree reading operations.
Reading NAND CS0, addr 0x00d80000, size 0x00000800 to 0xb63fbfe0

Reading NAND CS0, addr 0x00d80800, size 0x00022400 to 0xb63fc7e0
Reading zboot
....

Reading NAND CS0, addr 0x01280000, size 0x00000800 to 0xb5ffbfc0

Reading NAND CS0, addr 0x01280800, size 0x003aac00 to 0xb5ffc7c0
Reading primary file system
....

Reading NAND CS0, addr 0x00780000, size 0x00000800 to 0x01840000

Reading NAND CS0, addr 0x00780800, size 0x00402400 to 0x01840800
Reading secondary file system
The readings two and tree only take tree second. You must then operate during the second reading, then make the wire touch the VCC for less than a half of a second. The primary filesystem MD5 will be invalid. The WDTV will then directly boot to the secondary file system but will only partially execute the init script.
You should now get the jtag bash. If this is not the case, it’s very bad !
Insert the USB drive with the homebrew and run the command ./init upgrade.
Wait, reboot and flash.
I performed this only two times, but both flawlessly.
Good luck !

